NSM Exam Server
Contents
John Ringland, ringland@buffalo.edu, June 2020. Last updated 10/20/20.
Introduction
The NSM exam server has been set up to provide a way of delivering an individualized exam to each student.
The goal of individualizing exams is to suppress publication of exams (such as on coursehero.com) and to prevent cheating (using sites like chegg.com) by facilitating the tracing of exam questions back to the student who posts them, and also to log times and IP addresses of each student's access to the exam.
The first two kinds of individualizing - watermarking with the student's username, and steganographically encoding their identity - can be effective only against screenshotting and photographing of exam questions (which students will do if you don't watermark!). Deeper individualization varies the text of the questions and may also be effective against manual or OCR transcription of questions.
The following describes a process for generating and delivering individualized exams to students which will work even within a UBlearns Test that requires Respondus LockDown Browser.
The server
To connect to the server from off-campus, you need to be running a UB VPN client, downloadable from here: http://www.buffalo.edu/ubit/service-guides/software.html. For MacOS and Windows the recommended program is called Fortinet FortiClient VPN. For Linux, the Cisco AnyConnect Secure Mobility Client will work.
After establishing a VPN connection, you can log in and/or transfer files to the server.
Logging in
The server is yogiberra.sens.buffalo.edu. It can be accessed via ssh.
In your terminal (or powershell on Windows):
ssh yourusername@yogiberra.sens.buffalo.edu
The webserver root directory is /htdocs/www/exams_nsm. There is also a symbolic link /exams_nsm.
Each Math instructor has, or can have, his/her own subdirectory of this webserver root folder. If you would like to have an account on the server created for you, just email ringland@buffalo.edu to request it.
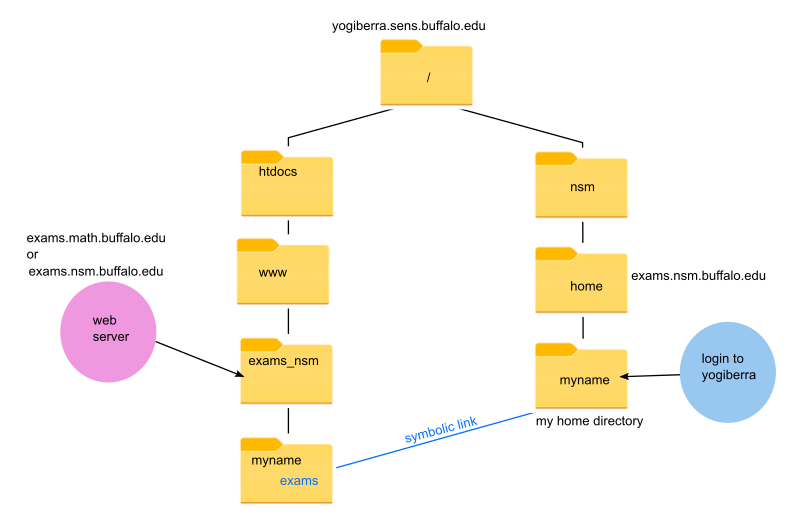
For your own convenience, you can make it seem like your exams folder under the webserver root is a subfolder of your home folder by executing the following command (just once) in the shell on yogiberra:
ln -s /htdocs/www/exams_nsm/UBitusername ~/exams
where UBITusername is your UBIT username. Then you can navigate to your own folder just like this:
cd exams
Browser access
The webserver root directory is available as https://exams.nsm.buffalo.edu.
TODO: Apache is still providing directory listings!!!
So files you put in your subdirectory can be accessed like https://exams.nsm.buffalo.edu/ringland/foo.pdf.
Copying files to server
Important: The names of exam source files and roster files must not contain any spaces or weird characters. Please stick to letters, numbers, hyphen, underscore, and period.
Files can be copied to the server using scp or sftp. On your local machine type something like:
scp foo.pdf ringland@yogiberra.sens.buffalo.edu:/exams_nsm/ringland/
Point-and-click file-transfer programs such as WinSCP for Windows, Fetch for Mac, or gFTP for Linux, also work and may be more convenient after initial setup, allowing you to drag-and-drop files between your local machine and the server. The port for SFTP is 22.
Bash command shell basics for beginners
The NSM Exam Server operating system is the CentOS distribution of Linux. You interact with the OS via the bash command shell (familiar to Mac and Linux users, but only recently available on Windows).
Among the most useful bash commands are the following, starting with cd which is used to navigate around the file system.
cd  <directoryname>           # change directory ("directory" is Linux-speak for "folder".) (".." means parent of current directory)
ls                            # lists files in current directory
ls -l                         # lists your files in 'long format' (size, who owns it, who can look at it, when last modified)
ls -lt                        # lists your files in order of modification time
ls -a                         # lists all files, including hidden files (whose name starts with a .)
more <filename>               # shows a file one screenful at a time (advance with spacebar and type q to quit)
less <filename>               # like more, only better (move with spacebar or up/down arrows)
head <filename>               # outputs the first lines of file (default 10)
tail <filename>               # outputs the last lines of file (default 10) (useful with -f option)
touch <filename>              # creates an empty file or updates timestamp
cat > <filename>              # places standard input into file (Ctrl-d to end)

mv <filename1> <filename2>    # moves or renames a file or directory (dangerous - see Aliases)
cp <filename1> <filename2>    # copies a file (dangerous - see Aliases)
rm <filename>                 # removes a file (dangerous - see Aliases)

nano <filename>               # lets you create and edit a file
diff <filename1> <filename2>  # compares files, and shows where they differ
wc <filename>                 # tells you how many lines, words and characters there are in a file
grep <pattern> <filenames>    # looks for the string in the files (asterisk can be used as a wild card in <filenames>)

chmod -options <filename>     # lets you change the read, write, and execute permissions on your files

history                       # prints all previous commands

<command1> | <command2>       # "pipe" the output of <command1> to the input of <command2>

alias <shorthand>="complicated command"
Commands you have executed previously can be recalled using the up and down arrow keys, modified if necessary, then executed again. The shell will complete filenames for you if you hit the Tab key. This saves typing and avoids errors such as from being in the wrong folder.
Aliases
Experienced users of bash typically have a large set of shorthands for complicated commands that they use frequently.
The alias commands that create these shorthands can be stored in a file called .bash_aliases in your home directory, and will be executed every time you start a bash shell. (Your home directory on this system is at /nsm/home/<username>. Note that your exam directory /exams_nsm/<username> is not your home directory, nor even in it.)
You navigate to your home directory by typing
cd
Among the aliases that you should absolutely positively have in your .bash_aliases are:
alias rm="rm -i"
alias cp="cp -i"
alias mv="mv -i"
These cause the commands rm, cp, mv to ask you for confirmation in cases where the operation could wipe something out. This is extremely important, because it is otherwise extremely easy to accidentally and instantly delete files (even a lot of files) - with no option of recovery.
Additionally you should include this command because the file system containing the Python 3 interpreter is, at the time of writing, not mounted by default on the server.
use python3
Other aliases or useful commands to be excecuted on startup are entirely up to you. The following might be useful:
alias me="cd /exams_nsm/<your user name>"
which will set the current working directory as your own exams directory.
Generating individualized exams
There are currently three available aspects of individualizing students' exams:
- watermarking the pages with the student's username
- steganography, where the student's identity is encoded into the fonts used for selected words
- individualizing the actual question text
The first two can be effective against photography or screenshotting (the former deters, both can be used to catch someone who posts publicly). The last can also be effective against manual or OCR transcription of question text.
In any case, individualized exam pdfs will be generated with filenames that contain both the student's username and a 4-character alphanumeric PIN for security. Something like ringland_6Gtu.pdf.
When accessing their exam via UBlearns and Respondus LockDown browser, students will be asked to enter their username, personal PIN, and exam password, and then the individualized pdf will be served.
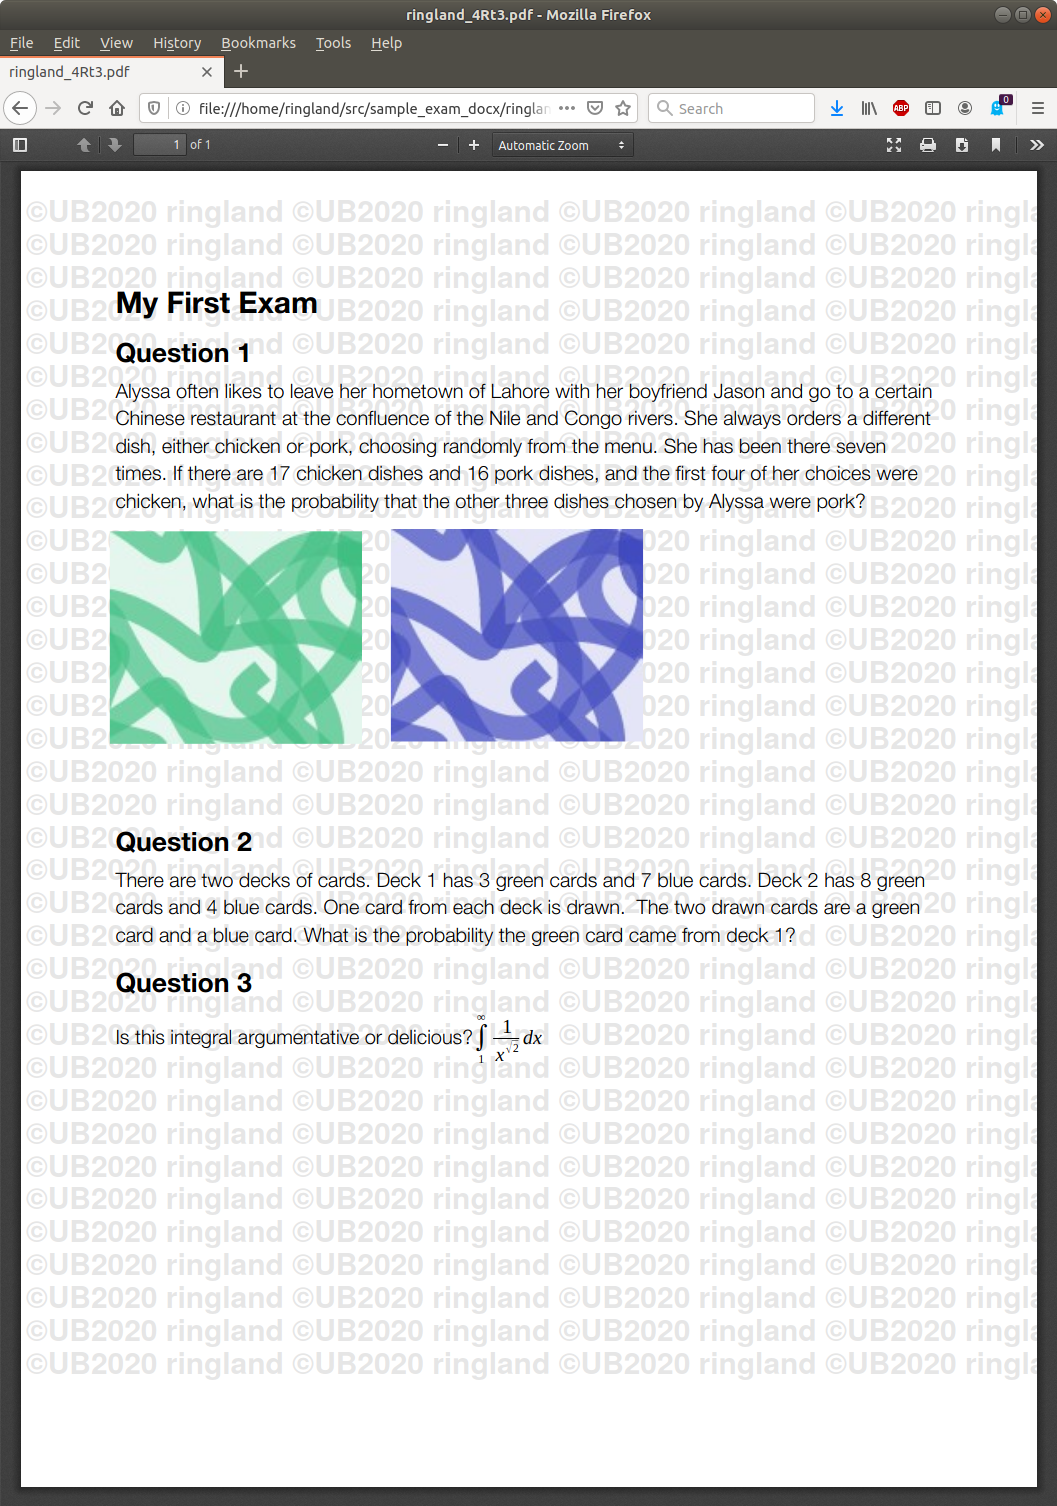
Watermarking with student username
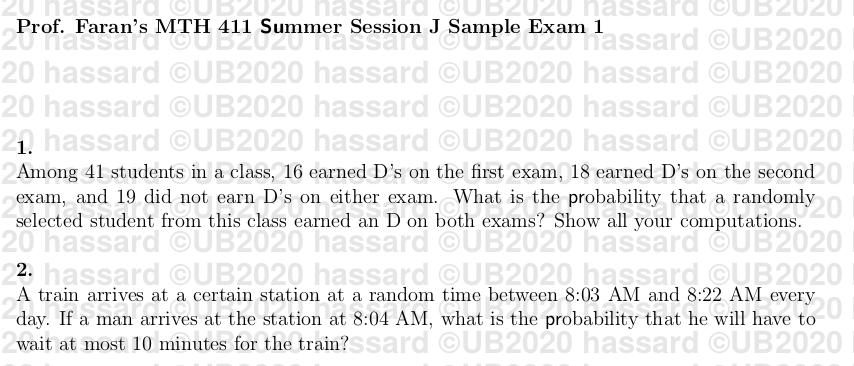
A minimal way of individualizing exams is to watermark them with the students username.

This allows tracing of any (naively) published exam back to the student who published it. It also allows you to know the precise time and IP address of each access or attempted access to each student's exam.
The watermark script
To use this script, you need to provide 2 files in your own top-level exams folder: a PDF and your class roster.
Assuming you have already executed the "use python3" command either manually or automatically via your .bash_aliases, all you have to do is:
watermark exam.pdf roster.csv
where
exam.pdf - is the PDF of which watermarked copies will be made

roster.csv - is a csv file with a roster of students containing
        at least the following columns. (Other columns may be present if desired.)

        either "email" or "ubit"
                where email data is like "ringland@buffalo.edu" (must be @buffalo.edu)
                and "ubit" data is like "ringland"

        "PIN"
                which is an alphanumeric PIN that will be appended to the username
                in the names of the generated watermarked pdfs.
Optionally, you customize in a number of ways.
You can add a hexadecimal RGB color specification like this:
watermark exam.pdf roster.csv color=ffb0ff
to specify the page background color. A distinctive color like 00ffff will make life much easier for exam proctors.
The watermarked pdfs will be put in a folder whose name is the input pdf name with the ".pdf" extension removed, and a random string appended to make it unguessable. This folder will be created if it does not exist.
Other options for the watermark script are:
- choose your own password of 1 to 12 alphanumeric characters, BUT LETTERS MUST BE UPPERCASE:
watermark foo.pdf roster.csv color=00ffff password=MYOWNWORD3
- choose the darkness of the watermark (between 0 for invisible and 1 for totally black)
watermark foo.pdf roster.csv color=ff00ff markdark=0
These optional arguments (color=, password=, markdark=) can be supplied in any combination and in any order.
Instructors should note that the watermark layer is underneath the question text layer, so elements in your source document with an opaque background will mask the watermark.
Here is what a sample run looks like:
$ watermark pseudo-exam8.pdf 411_fake_roster.csv
Using fpdf for watermark creation
Using PyPDF2 for merging
['/usr/local/bin/watermark', 'pseudo-exam8.pdf', '411_fake_roster.csv']
Background color (255, 255, 0)
Watermark color (237, 237, 0)
Locking down pseudo-exam8.pdf
Locking down 411_fake_roster.csv
Added entry for this exam to lookup table
Watermarked pdfs will be in pseudo-exam8_f55272aee
Creating pdfs
        badzioch
        hassard
        jjfaran
        ringland


URL: https://exams.math.buffalo.edu

Password: PWQZET
The universal portal page https://exams.math.buffalo.edu is where students will go to obtain their individualized PDF with the exam questions by entering their username, PIN, and exam password:
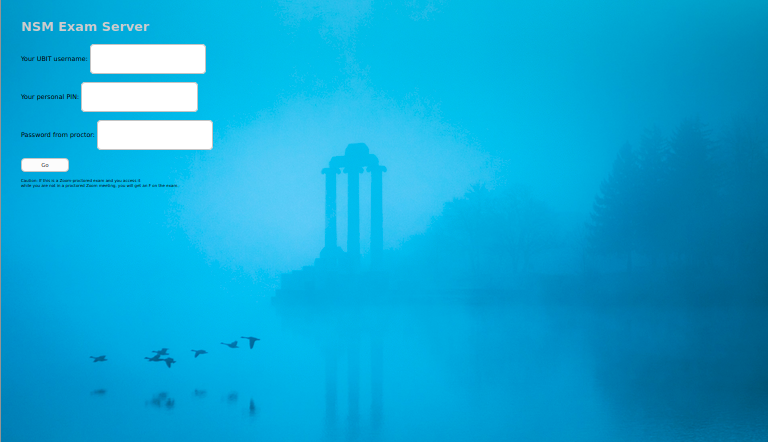
If they enter invalid data, they will be bounced back to a similar page that has a predominantly yellow photo of the same scene.
For experts: "watermark" is a symbolic link in /usr/local/bin to the Python script /htdocs/www/exams_nsm/ringland/watermark.py.
Steganographic encoding of student identity
NOTE 10/3/2020: Recent enhancements to the watermark script have not yet been ported to the individualize script.
You can also encode the students' indentity into the individual PDFs in a way that is not obvious to the students. This is called "steganography".
If you add the following markup to your LaTeX source document (not currently available for Word documents)
%i% STEGWORDS ADD Summer probability
(outside any BEGINSCOPE/ENDSCOPE block: see below) the binary representation of the student's position in your roster will be encoded in the font of all occurrences of the words "Summer" and "probability".
Each student's binary code is given in a student parameters file that is generated by the script: see the section "Grading" below.
The individualize script
You build the exams with the command
individualize my_first_exam.tex my_student_roster.csv
Here is an example output, where the student "hassard" has binary code "11": you will see that the first two letters of all "Summer"s and "probability"s are in a discernably different font which is used to represent "1"s in the binary code.
Deeper individualization: varying the question text
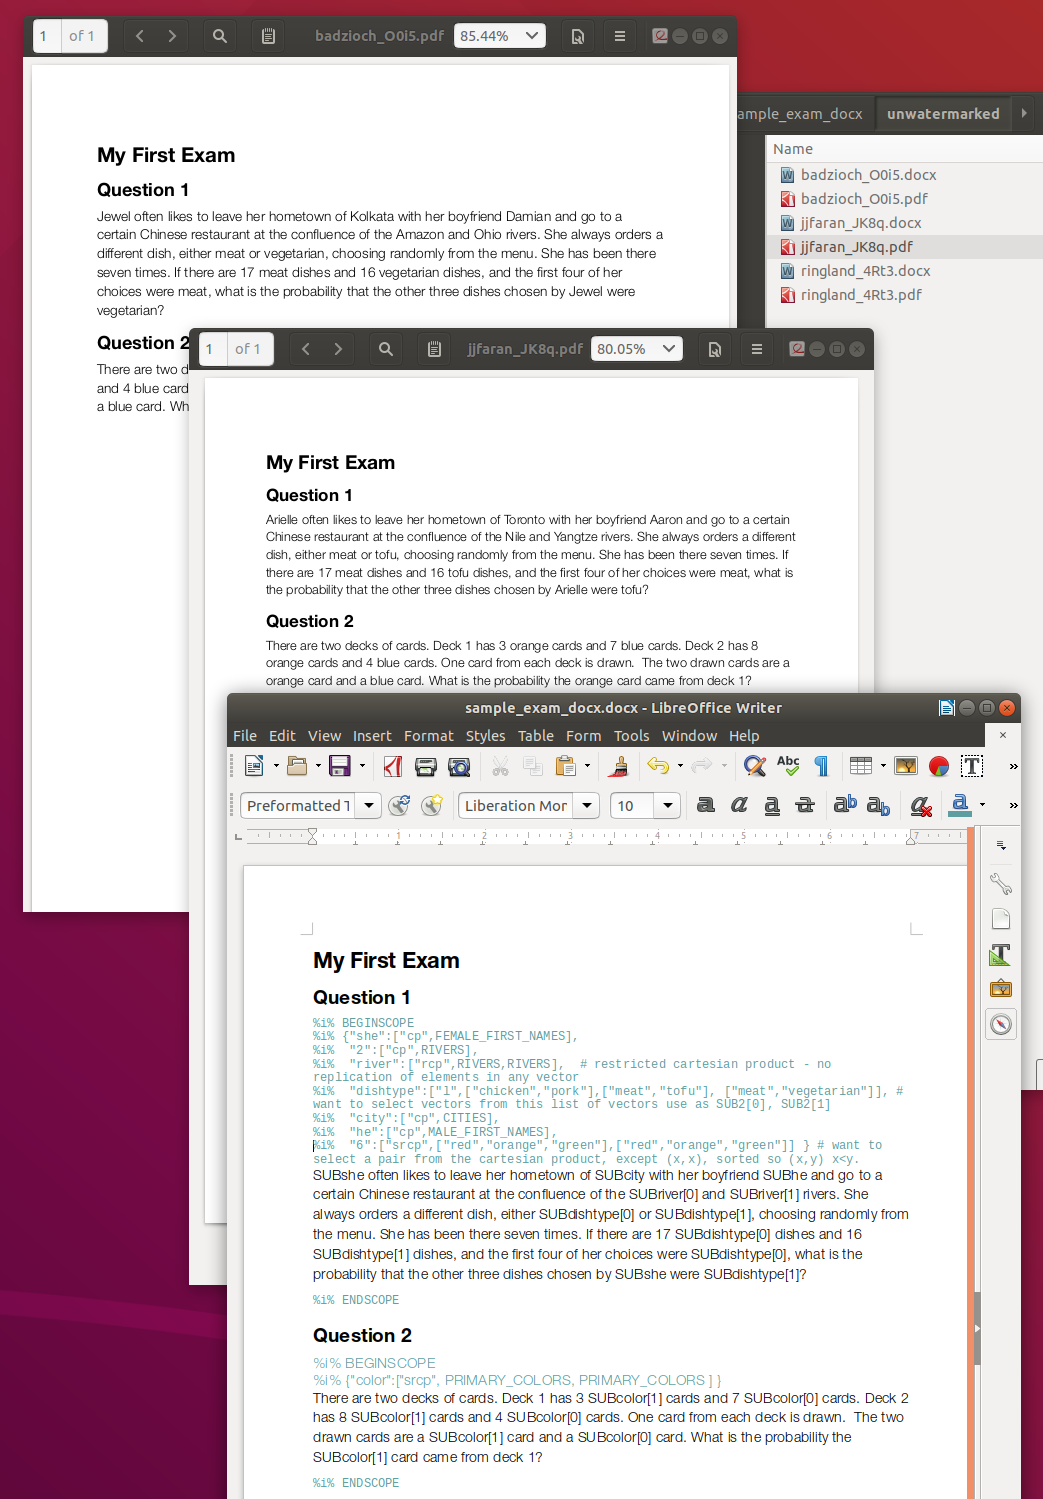
We have a framework for very flexibly individualizing the exam questions, whether your exam source code is in LaTeX or docx.
Individualization markup
The idea is that in certain places that you identify with a string like "SUBfoo" or "SUBfoo[0]" or "SUBfoo[1]" you want to insert elements of a list, or "vector", of words or phrases that is chosen for each student from a list of possible vectors.
This list of vectors can either be given explicitly by you, such as
%i% {"foo":[ "l", ["chicken","pork"], ["meat","vegetable"], ["alcoholic","non-alcoholic"] }
("l" for explicit list) which will be substituted for "SUBfoo[0]" (first element of selected vector) and "SUBfoo[1]" (second element) in your latex source
or constructed as (optionally a subset of) the cartesian product ("cp") of sets of words and/or phrases that you provide such as
%i% {"bar":[ "cp", ["chicken","pork","beef"], ["Chinese","Indian","Italian","Vietnamese"], ["red","yellow","green","blue","violet"]] }
In this example, the list of generated vectors will have length 3x4x5 = 60, i.e. enough for each student in a class of 60 to have a unique vector, so that the text will uniquely identify the student.
For convenience, some pre-made lists are available, including: FEMALE_FIRST_NAMES (the 1500 most popular in the US in the year 2000), MALE_FIRST_NAMES (1500 also), CITIES (all the large cities in the world), RIVERS (6 or 7), PRIMARY_COLORS. Others could be added upon request.
In addition to the full cartesian product ("cp"), options are "restricted cartesian product" ("rcp") which means to select a vector from the cartesian product only if all its elements are distinct. This is useful, for example, in a case like
%i% {"2colors":[ "rcp", PRIMARY_COLORS, PRIMARY_COLORS ]}
you likely want each vector to have two distinct colors. There is also a "srcp" option in which each vector is internally sorted in lexicographic order
%i% {"2colors":[ "srcp", PRIMARY_COLORS, PRIMARY_COLORS ]}
so that you can be sure that if a student gets "green" and "red", the green will be SUB2colors[0] and the red (being later in the alphabet) will be SUB2colors[1].
Vectors are chosen sequentially from the list of vectors, so if the number of vectors is not less than the number of students, each student will get a distinct vector. Otherwise selection cycles repeatedly through the list of vectors.
Summary of markup codes
- l = list - sample vectors are chosen directly from the list you provide
- cp = cartesian product - sample vectors are chosen from the cartesian product of the sets you provide
- rcp = restricted cartesian product (only vectors with distinct elements are chosen)
- srcp = sorted restricted cartesian product (only vectors with distinct elements are chosen and vectors are internally sorted lexicographically)
Markup example
Here is an exerpt from a LaTeX source file:
%i% BEGINSCOPE
%i% {"she":["cp",FEMALE_FIRST_NAMES],
%i%  "8":["cp",["alpha","beta","gamma"],["1","2"] ],
%i%  "2":["cp",RIVERS],
%i%  "river":["rcp",RIVERS,RIVERS],  # restricted cartesian product - no replication of elements in any vector
%i%  "3":["l",["chicken","pork"],["meat","tofu"], ["meat","vegetarian"]], # want to select vectors from these pairs, use as SUB2[0], SUB2[1]
%i%  "4":["cp",CITIES],  # want to select pairs from the cartesian product
%i%  "5":["cp",MALE_FIRST_NAMES],
%i%  "6":["srcp",["red","orange","green"],["red","orange","green"]] } # want to select a pair from the cartesian product, except (x,x), sorted so (x,y) x<y.

SUBshe often likes to leave her hometown of SUB4 with her boyfriend SUB5
and go to a certain Chinese restaurant
at the confluence of the SUBriver[0] and SUBriver[1] rivers.
She always orders a different dish, either SUB3[0] or SUB3[1],
choosing randomly from the menu.
She has been there seven times.
If there are 17 SUB3[0] dishes and 16 SUB3[1] dishes,
and the first four of her choices were SUB3[0],
what is the probability that the other three dishes chosen by SUBshe were SUB3[1]?
%i% ENDSCOPE
Running the individualize script
Here is how to run the script:
individualize my_first_exam.tex my_student_roster.csv
And here is some sample output:

Verbose option: By default, output from pdflatex is hidden. In case you want to see this output, use the "-v" option:
individualize my_first_exam.tex my_student_roster.csv -v
If the script does not successfully run to completion, a good thing to try is see if your latex source itself is successfully compiled by pdflatex on the server:
pdflatex my_first_exam.tex
Microsoft Word (.docx) source
The individualize script was written with LaTeX source in mind, but it will handle a source document in .docx format instead, if needed. (Note to experts: the individualize script actually hands off the job to a separate script individualize_docx.py that handles Word documents.)
Inserted images and formulas are preserved through the process (see below), but users are advised to visually check that these elements haven't changed position in a way that is not desired, and in general to keep the document simple - because I don't have the significant amout time it would take to write a totally robust processor for Word documents.
Steganography is not currently available with Microsoft Word source files.
Student PINs
We build a PIN into the filename of the individualized PDFs as a way of making it practically impossible for someone to guess the filename of another's PDF.
Randomly generated 4-character alphanumeric are a good choice because they are short and there are over 14 million possibilities (if upper and lower case are used). But anything (without spaces or special characters) could be used as long as the PINs are unguessable.
PINs for all by the Assoc. Chair
How to privately communicate each student's unique PIN to the student? Some of us have mechanisms for sending individualized emails to students, such as the Mail Merge Add-on for Thunderbird, but others don't.
One possible solution is for the Assoc. Chair to assign a PIN to every student registered in a MTH class. This seems easiest. For the Fall 2020 semester, I have done this on Sep 10, 2020: created a PIN for every registered student, emailed it to the student, sent a link to a CSV file with all the PINs to each instructor by email. IMPORTANT: incorrect versions were sent to instructors initially. Fixed versions were emailed on Sep 20: make sure you are using a file whose name ends "_fixed.csv".
Those csv files look something like:
/exams_nsm/agsamer/2206_MTH_142LR_JJ_agsamer_g8kndkfsyfh265khyif861.csv
The random string in the csv filename is to make it unguessable.
Communicating PINs to students with UBlearns
Another way of communicating PINs privately to students is to create a PIN column in the UBlearns grade book. This can be done by uploading a comma-separated or tab-separated CSV file by clicking "Work Offline" > "Upload" near the top right of the Full Grade Center. The CSV file need only have a "Username" column as well as the "PIN" column, something like this:
Username,PIN
ringland,GT7u
biondini,YhM5
casper,2J4Q
Note: if you follow the directions in UBlearns to "first download the Grade Center and then edit the file with the data to be uploaded", and copy and paste the PIN column into the downloaded UBlearns spreadsheet, please be sure to first sort the rows in both files by Username or both by person number: I do not guarantee any particular row order in the files I provide.
Generating your own PINs
If you want to generate your own pins, here is one way (with Python):
npins = 60
pinlength = 4

lower = 'abcdefghijklmnopqrstuvwxyz'
upper = lower.upper()
numerals = '0123456789'

alphabet = numerals + lower # + upper
# omit a few confusable characters
alphabet = alphabet.replace('l','').replace('I','').replace('0','')
alphabet = list(alphabet)

print('Choosing from',len(alphabet)**pinlength,'possible pins')
import numpy as np
for i in range(npins):
             PIN = ''.join(np.random.choice(alphabet,pinlength,replace=True))
             print(PIN)
Four-character PINs with numerals and lower-case letters provide over 1 million possibilities. Adding upper-case letters expands the pool to over 12 million. Either is sufficient for our purposes of making them unguessable in practice, even for the largest class sizes we anticipate ever having.
Giving access to individualized exams in UBlearns
Link in UBlearns Test
The individualization script gives you a link for the exam access page which will look something like https://exams.nsm.buffalo.edu/jjfaran/faran_411JSU20_seventh_exam/tree_Kfbsbv37tuFoPab0a5FHAU.html
This should be kept secret at least until the start of the exam, and should be the URL of a link in your UBlearns exam. If this URL is not visible to students, this will prevent access to the exams from outside the UBlearns/Respondus environment.
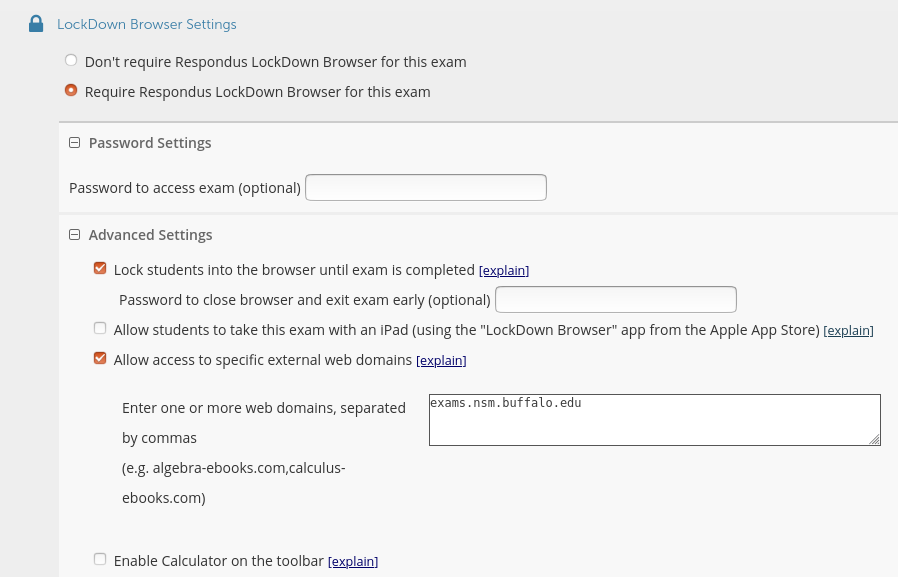
IMPORTANT: The exam server domain, exams.nsm.buffalo.edu, must be white-listed in the Respondus settings for the Test on UBlearns. Otherwise LockDown Browser will not allow access.
Changing access permissions on exam server
If you keep the link secret, and only available via the UBlearns Test, no student will be able to access your exam except via UBlearns at the time of the Test, due the unguessability of the link.
However, if for some reason you wish to publish the link to an exam, you can still control access to it by changing the file permissions on the server.
chmod 700 testpdf/username_and_pin_eLZ5gfywvPuApwdyRps.html
makes that file unreadable by anyone but you (while logged into the server). If someone were to try to access it via the webserver, they will see:

At the start time of the exam, you can restore web access by
chmod 755 testpdf/username_and_pin_eLZ5gfywvPuApwdyRps.html
Changing access to individual student exams
You can also use "chmod 700" to prevent access to any other individual file or folder. For example, if a particular student is taking an exam in a different mode (such as Zoom) or at a different time, you can "chmod 700" that student's exam, and then restore access by "chmod 755" whenever desired.
Making a time chart
To help you determine if students did things within the required intervals of time, you can make a chart like the one below which shows time in Zoom proctoring (bars), accesses to exam on exam server (blue squares, or magenta if a second IP address was used), and submission to Gradescope (green dots, or red if student did not attend Zoom proctoring), and the time between Zoom exit and Gradescope submission.
If Department staff built your exam on the server, just email the Gradescope grade sheet to the Dept secretary, Michelle Hacker <mahacker@buffalo.edu>. The timechart will be made for you.
If you built your own exam on the server, put the Gradescope sheet into the corresponding exam folder such as myexam1_5ac3gb808.
The Zoom meeting participant reports (participants_meetingid.csv) will be downloaded from Zoom and uploaded to a standard location on the exam server by Department staff, usually within a few hours of the end of the exam. The instructor will recieve notification when this has been done. (Each of these reports lists every arrival and departure from the corresponding Zoom meeting, with precise timestamps.) As soon as this has been done, you can make your timechart. The chart script knows where to look for the participant reports.
To do this, run
chart myexam1_5ac3gb808
You can also do
chart myexam1_5ac3gb808 from=10/07/2020
to exclude any accesses (perhaps your testing) before 10/07/2020. You can specify the cutoff to the minute if you wish:
chart myexam1_5ac3gb808 from=10/07/2020_14:00
There is also "to=", which works the same way.
And
chart myexam1_5ac3gb808 from=10/07/2020 anon
if you want to make an anomymized chart (like the one above) where random star names are substituted for the student usernames.
In any case, a link to the created (SVG) chart will be produced.
Grading
In case individualization is being used to vary substantive parameters of the questions, for reference the individualize script generates a table of the vectors used for each student in both JSON and CSV formats: student_parameters.json and student_parameters.csv.
